Showing posts with label diy. Show all posts

Monday, October 22, 2012

DIY Halloween 2012 | Michonne

zb5kphx2012_cactusmango3zb5kphx2012_cactusmango5zb5kphx2012_cactusmango6zb5kphx2012_cactusmango7zb5kphx2012_cactusmango1zb5kphx2012_cactusmango4
zb5kphx2012_cactusmango8zb5kphx2012_cactusmango9zb5kphx2012_cactusmango2

DIY Halloween 2012, a set on Flickr.
My first zombie themed race day was crazy hot and totally worth it. The best part is when I heard, "Dude, it's Michonne!" as I was passing through a crowd of zombies pre-race. stay tuned for a post on how I put together my Michonne look.

Wednesday, August 8, 2012

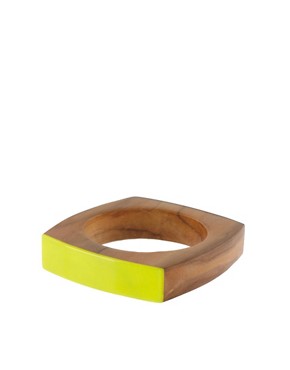
DIY: Color Panel on Wooden Bangle

What to do when the bangle you love is out of stock?  Shop the clearance racks at Target and score an angular shaped bangle and paint it your favorite color or to match your outfit. This is a super quick diy. Just tape off an area on the bangle, paint, let dry, touch up with a sharpie and enjoy! 


I liked the white panel on black, but really wanted the look of this ASOS Angular Wooden Bangle with Neon Perspex Panel.  So, I repeated the steps above and painted over the white with Citron craft paint, with the intent to mod podge or glaze over the craft paint...but  After doing this, I realized it wasn't a smart move to paint craft onto nail polish. Next time, I'll stick to just citron craft paint on white craft paint, covered with mod podge. Or I'll have to buy a neon green or citron nail polish, to go over the white nail polish. OK, sorry for rambling a bit, it's hard to type & concentrate when my two year old is hanging all over my arms and lap cranky.  It's her  nap time.

Well, I hope the pictures will suffice in helping you diy your own color paneled  wooden bangle! 


with triple thick glaze


inspiration bangle


links to some more diy neon wood bangles:


Saturday, September 3, 2011

Project: Sprouts for Sprouts

Planted sixteen "baby" jades tonight for Phoenix Children's Hospital.  
They're so cute. I'm thinking about naming each one.        
But, I don't want to get too attached to these guys, because I'll be sending them home 
with the kind folks who happen to fill up my collection jar with their generous donations.
You see, a long time ago, my aunt and my father in law gave me clippings of jade stems from their plants.  Using what little gardening experience I had, I've managed to keep them alive.  Maybe it's because I may have inherited some of my dad's and mom's green thumbs...but, I think it's due to how strong and hardy these little guys are.  

Even when I've forgotten to water them and they're all shriveled and dehydrated.  They still spring back to life after a good watering. Now those little stems have grown into several large pot fulls in my back yard.  
Now, I want to share them with those kind enough to share something for the children and their families at Phoenix Children's Hospital. 
I've enjoyed designing the poster and the thank you labels, (which I still have to adhere to the rest of the jars!)  But, What will be even more rewarding, is seeing these little pots of dirt & plant, going to a new home.  They are easy to care for and can be snipped and multiplied into even more plants.  I can imagine how they'll brighten up a desk space, kitchen window or even the bedside of someone you love.  

If you prefer to make an online donation, please visit my fundraising home page @


It's late and I still am insanely thinking I can crawl out of bed for the group run at 6am.  I know what song I'll be singing in my head during the run tomorrow...This one's for my fellow dirt girls + boys.  This is my shout out to my mom + dad.  Thank you for growing me right.  Here's a song for you.  


Well I've done a lot of digging
And I'm still nowhere near pooped
So here's a song I like to sing
And you can sing it tooped

Make a little hole,
Put a seed in it
Cover it up with dirt
It only takes a minute
And before you know it
You can help to grow it

Help the garden grow
Helping the garden grow
Help the garden grow
Helping the garden grow

Take a water can
Put some water in it
Sprinkle it on the ground
It only takes a minute
And before you know it
You can help to grow it

Help the garden grow
Helping the garden grow
Help the garden grow
Helping the garden grow

Make a little hole
Put a seed in it
Cover it up with dirt
It only takes a minute
And before you know it
You can help to grow it

Help the garden grow
Helping the garden grow
Help the garden grow
Helping the garden grow
Help the garden grow
Helping the garden grow
Help the garden grow
Helping the garden grow

Thursday, August 25, 2011

Fabric Erase Chore Chart

I recieved my free fabric swatch in the mail yesterday from Spoonflower!  It's cool!  This fabric called "Round the Bend Grey" is designed by  Cristina Pires

My hubby says he doesn't get the fascination.  It's just a piece of fabric.  Uhm, helloooo, it's chevron, gray and white, what more do you need?  I thought I better come up with a quick way to make this functional and displayed in our house.  Then I remembered my FB wall post that I shared not too long ago about a blogger who turned a picture frame into a chore chart.  I have a frame if you've seen my previous post, that's in need of a purpose and cool fabric that I want to display...but it has to be functional too.   So, here's what I it looks like. Perfect!  Now where will this live?  And will the chore chart really help me stay on task...hmmm?


Sunday, July 17, 2011

Kids Vanity Update

So, we did away with my Sea foam dreams and went with classic white. My S.O. spent one morning spray painting the vanity in the backyard. We let it dry, but got side tracked with "other things".

Then a couple weeks went by...My S.O. and bro became so enthusiastic about the project with the prospect of finally being able to use my bro's reciprocating saw *cue the choir of angels* to cut out the wooden top inlay. They went and got some nice pressed wood. Traced the glass inlay for the exact shape and after several cautious passes with the saw, they successfully cut out the wooden inlay.

My S.O. then spent the morning sanding it to give it a nice soft kid friendly edge and spray painted it as well. The paint we chose was labeled "high gloss" but, I think the result was more like a regular gloss. I was hoping for a super high gloss that looks like it's wet glass. Don't know how to achieve that, especially with all the nooks & crannies

 Then we got sidetracked with "other things" again. Eventually, I got tired of it not being done plus, my kids a weed. If I waited anylonger to finish this up, she'd be using this vanity table as a bench. I found some wipeable white caulk in our garage stash. I used wet towels and my fingers to glue and seal the wood inlay into place. This took longer than I thought, because I had to scrap off carefully all the excess goop. In hind sight, I should have used blue painters tape, to protect the edges and make for an easy clean up. Duh.

Lastly, I stopped by Lowe's and told an employee what I was needing...something to secure the vanity to the wall, something white and something flat. If we couldn't find anything, then I'd resort to some kind of white fabric ribbon. He showed me the perfect solution: Plastic Hanger Strap (3/4" x 10"). It conviently has pre-drilled holes evenly spaced apart. All I did, was count how many holes it took to wrap around the vanity leg, added one extra hole for good measure.

Next we needed to make it safe.  S.O. drilled a drywall anchor into the wall behind where the vanity's location. He then made a loop with the plastic strip, aligning the last two holes on each end and placed a screw through it and the wall, for both back legs of the vanity. Lastly, we slid the vanity through the two secured loops. You can't even tell the loops are there. They blend in so well. done!

We're happy with the result and our little girl loves it too! Now the quest is on for a kid safe mirror...

update, 8/23/11: I haven't found a kid-safe mirror yet, but I did find a super cute framed bulletin board!  It's an American Girl product on sale for 13.99 at Safeway.  After I brought it home, I looked online to see if it was a good deal or not.  Seems like a discontinued or not readily available product.  It was sold out on Overstock.com, where it was priced at 9.99.  Would have loved it for that price, but, I'm happy I was able to get one!  The frame is a white painted metal with a darling scalloped edge.  I think that's what really got me.  I don't see too many scalloped metal frames around.   The back of the frame has two sets of hanging notches.  The board is covered in a cute green & white polka dot fabric.  Also, since the board is screwed in, it's easily replaceable in the future!

Wednesday, April 6, 2011

Sea Foaming at the Mouth!

Say hello to my next non-digital project. Posting it up here in the blogosphere for both accountability and for HELP! But first I want to give a big thank you to auntie & uncle Tamondong and Merlz for selling me these two little treasures with the bonus vintage pic! Gotta love that. hahaha. Seriously though, aren't they just lovely - all gaudy and gold? Which brings me back to - HELP!!!! I have a vision of this reborn in high-gloss white with accents of sea foam. To help me envision the finished project, I put together an "inspiration board". I got lost at sea yesterday googling sea foam clad thingamabobs. I was sea foaming at the mouth.
After all that effort, I looked for sea foam high-gloss spray paint and found - NONE. So, again I say, HELP! I know. I know. Maybe I need to give up on my vision and just make it easier on myself. Paint the table ALL white. Paint that picture frame sea foam with craft acrylic paint. That is definitely my plan B.


But, I will throw this out there to all the crafty artsy fartsies:

  • Where can I buy high gloss sea foam colored paint for plastic?
  • What's the best high gloss white paint for plastic?

*  Tue, Aug, 9th  NOTE:  See the finished project here >  kids vanity update